Comprehensive Guide to OutEquipPro Top-Mounted Heating and Cooling AC for RVs, Trucks

Model: WH1099321

This comprehensive guide provides detailed information about the OutEquip Top Mounted Air Conditioner for RVs and Trucks. It covers a wide range of topics, from installation procedures to troubleshooting tips, ensuring users have a thorough understanding of the product. The guide also includes safety performance details, application requirements, and how to optimize the cooling effect. Additionally, it provides a list of error codes for easy reference during troubleshooting.

A full read-through of this guide is estimated to take about 20-30 minutes.

Contents:

  • Product Diagram: A visual representation of the product.
  • Installation Guide: Step-by-step instructions on how to install the product, including specific requirements for the sunroof opening.
  • Working Mechanism: Explanation of how the air conditioner operates and its performance under different conditions.
  • Safety Performance: Details about the product's structural and electrical safety features.
  • Application Requirements: Guidelines on how to use the air conditioner while driving, including battery and generator capacity requirements.
  • Inner Control Panel & Remote Control: Description of the control panel and remote control functions.
  • Troubleshooting Guide: Solutions to common issues such as low voltage display, high voltage display, and pressure switch protection.
  • Optimizing Cooling Effect: Tips on how to ensure the best cooling effect, including pressure measurements, refrigerant type, and wiring considerations.
  • Error Codes: A list of error codes to assist in diagnosing system errors or malfunctions.

1. Diagram

top mounted air conditioner dimension

2. Installation

Installation Steps

RV air conditioner installation steps

Note:

a) During installation, as illustrated below, begin by securing the tension bar using the screw (threaded at both ends) and tighten it to the main unit using Nut 1.
Next, install the interior panel and secure it with Nut 2. Finish by inserting a decorative rubber plug into the outer hole.

b) This top mounted air conditioner requires a sunroof opening that is larger than 225mm x 299mm(8.86*11.77inch) and smaller than 440mm x 580mm(17.32*22.83inch) for installation. If your vehicle doesn't have a sunroof, you can still install the air conditioner by creating an opening in the specified dimensions.

RV air conditioner install

3. How the Air Conditioner Works

  • The refrigerant circulates under the compressor's action. In the engine compartment, the refrigerant transforms from a gaseous state to a liquid state in the condenser, releasing heat. Inside the vehicle, the refrigerant evaporates from a liquid state to a gaseous state, absorbing heat and thus lowering the interior temperature.
  • This RV air conditioner has been rigorously tested in extreme conditions, ranging from -28°C/-10°C (for PTC/heat pump) to 50°C. It operates normally under these conditions without triggering any protective measures, making it suitable for diverse climates across the US.

4. Safety Performance

  • Structural Safety: The product is designed with strength reinforcement at points of force application. We aim to achieve lightweight while ensuring sufficient strength, optimizing the product's cold-to-weight ratio and maximizing vehicle cruising range.
  • Electrical Safety: The product uses a DC 12V voltage input, significantly enhancing safety performance. We have implemented multi-directional electrical safety protections such as overvoltage, undervoltage, overcurrent, and short circuit to ensure product electrical safety. The air conditioner meets the IP54 safety protection level.

5. Application Requirements

  • When using the air conditioner while driving, ensure the battery is fully charged and the generator's capacity exceeds 75A. If your vehicle's generator is less than 75A, monitor the battery level on the dashboard and stop using the air conditioner if the battery level drops. The compressor controller may misinterpret a fully charged battery when the generator is running at high voltage, leading to battery drain. If the generator's capacity is less than 55A, undervoltage may occur. This could lead to a situation where there's not enough power for the air conditioner or other electrical systems to operate properly, especially if the vehicle is parked and the engine is not running to allow the generator to recharge the battery. To avoid this, ensure your generator has sufficient capacity and your battery is fully charged before using the air conditioner.
  • To optimize the air conditioner's performance, we recommend installing a power battery set of 200A or more and a generator of around 70A. This setup can support the air conditioner for approximately 5 hours during hot daytime and over 10 hours at night.
  • Install the air conditioner's external unit away from the engine's exhaust pipe to prevent overheating. Ensure a minimum distance of 10 cm between the air conditioner's back panel and the cab for sufficient air intake for the condenser fan.
  • Environmental Requirements: The outdoor unit should operate normally 24/7, 365 days a year under conditions of ambient temperature -15~48℃, relative humidity ≤90%, and exposure to sun and rain. Cooling is possible at this ambient temperature.
  • System Pressure Protection Switch: Closes at ≥2.5MPa and restores at 2.45MPa (for reference). Closes at ≤0.18MPa and restores at 0.23MPa (for reference).
  • System Refrigerant Moisture Content: Maximum of 75PPM.
  • Dust Content: Maximum of 30mg.
  • Drive Maximum Voltage: The main power supply voltage should not exceed 450VDC, otherwise it will damage the internal components of the controller.
  • Suction and Exhaust Pressure Connections: The compression bolt torque for the compressor suction and discharge ports is 11±1 NM.
  • Compressor Mounting Angle: The compressor body should not be installed obliquely. The angle between the main axis of the compressor and the horizon should not be greater than 5°.

Other Requirements:

  • Avoid installing the electric compressor at the condenser's air outlet to ensure sufficient cooling of the controller.
  • The compressor requires refrigerant to cool the motor and controller. Insulation and heat preservation pipes should be added to the suction line.
  • To prevent the system from absorbing too much moisture and causing insulation decline, install the compressor in a closed system immediately (within 5 minutes) after opening the suction and discharge ports.
  • Equip the compressor with vibration damping feet for vibration reduction and noise reduction.
  • The cooling capacity of the condenser should meet system requirements, and the installation location should have enough cooling space.
  • The compressor controller contains an energy storage filter capacitor. It needs to be powered on by pre-charging to prevent power-on pulse current from causing impact damage to the relay and insurance.
  • Use an independent fuse for the compressor branch circuit. It should not be used in parallel with parts related to vehicle safety (such as using the same set of relays and fuses).
  • Turn on the condenser fan 6 seconds before the compressor starts to reduce pipeline pressure. After the compressor stops, turn off the condenser fan after a delay of 6-10 seconds.
  • Long-term operation of the compressor under extreme working pressure and abnormal working pressure will increase the failure rate of the compressor and shorten its service life.

6. Inner Control Panel

  1. Power Indicator
  2. Heating Mode Indicator
  3. Sleep Mode Indicator
  4. ECO Energy-Saving Mode Indicator
  5. Rapid Cooling Mode Indicator
  6. Temperature(Centigrade)
  7. Voltage
  8. Temperature(Fahrenheit)
  9. Mode Selector
  10. Temperature Increase Button
  11. Temperature Decrease Button
  12. Error Alert
  13. Low Voltage Indicator
  14. Remote Signal Receiver
  15. Fan Speed Display
  16. Main Power Switch
  17. Airflow Increase Button
  18. Airflow Decrease Button

7. Remote Control

RV air conditioner remote control
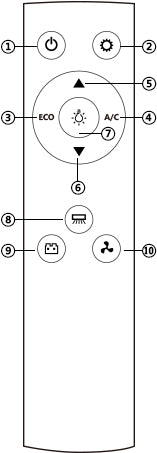
1. Power Button: Short press to turn the unit on or off.
2. Set Button: Enter the setting interface.
3. Energy Saving Button: Activates the energy saving mode.
4. Mode Key: Cycles through different modes.
5. Temperature Plus Key: Adjusts and sets the temperature point to increase.
6. Temperature Minus Key: Adjusts the set temperature point to decrease.
7. Screen Light Control Key: Turns the control screen light on or off.
8. This functions is unavailable.
9. Voltage View Key: Displays the current voltage level.
10. Air Volume Key: Adjusts the volume of airflow.


8. Troubleshooting Air Conditioning Failures

Low Voltage Display:

  • Check if the positive and negative electrodes are loose or if there's insulation on the negative wire contact surface.
  • Check if the positive and negative poles of the air-conditioning power supply and the on-hook line are causing a voltage drop.
  • Check if the power plug is loose, or if the wires of the harness are too thin or too long, causing the wires to heat up and form a voltage drop.
  • Check if the battery is low on power, and if the air conditioner is using the parking power battery (electric vehicle battery).
  • Check if the generator's power is too small, or if the live wire of the generator is too thin, causing the generator to charge the battery too little or the battery cannot be charged, and if the battery cannot store electricity.

High Voltage Display:

Check if the positive wire is wired incorrectly or not connected to the positive terminal of the battery.

Pressure Switch Protection:

  • Check if the system leaks, resulting in insufficient refrigerant pressure.
  • Check if the electronic fan is working, causing insufficient condenser heat dissipation and excessive refrigerant pressure.
  • Check if the condenser is blocked, causing insufficient condenser heat dissipation and excessive pressure. If so, clean the condenser.
  • Check if the refrigerant pressure is caused by the expansion of the refrigerant due to excessive temperature. If the amount of refrigerant is too large, drain a small amount of refrigerant or adjust the expansion valve.

Compressor Overheating:

If the compressor surface temperature is too high, stop using it and check the cause of the failure. Repeated protection can damage the compressor.

Note:

  • After under-voltage shutdown, you need to turn off the power and turn it on again to start again.
  • The exhaust pressure should be adjusted to 12-14kg as much as possible. When the high pressure exceeds 22kg, the air conditioner will automatically stop. It is necessary to release part of the refrigerant and wait for 5 minutes.
  • The low pressure protection of the compressor is 2.6kg, below this pressure the compressor will not start.
  • Always check the pipeline system for leakage and wear, check whether the fasteners are loose or fall off, and find any abnormal phenomena that should be eliminated in time. In case of failures that cannot be discharged, please go to a professional maintenance point.

9. How to Ensure the Cooling Effect

  • After installation, ensure to measure the high and low pressure. The high pressure should be controlled at about 14Kg (when the ambient temperature is about 32°C). It is best to control it below 14Kg when testing indoors or at night. Otherwise, the pressure will rise very high at high temperature and the pressure will be too high. The temperature of the refrigerant will be too high and the cooling effect will be affected.
  • Use genuine R134a refrigerant
  • Use genuine R134a hose, otherwise, the refrigerant and refrigeration oil will deteriorate.
  • The wiring should be thick. The line from the battery to the compressor can use 10 square lines under 2 meters, and 16 square lines for 2-5 meters. Use 25 square lines for more than 5 meters. 16 square lines should be used between multiple batteries. A 10-square line is used between the installed generator and the battery. ( Note: Due to the large current of the electric compressor, the thin line will cause a large line loss, please follow the wiring diagram requirements )
  • As far as possible, use the battery fully every time. Running at low power will reduce the speed of the compressor and affect the effect.
  • The vacuuming must be in place during installation, because the electric compressor is very sensitive to moisture and air, and requires high and low pressure vacuuming at the same time, it must be pumped to more than -0.098, and the time should be more than 20 minutes. After maintaining the pressure for 10 minutes to confirm that there is no leakage in the system, add refrigerant.
  • The expansion valve should not be too large (1.2-1.3 cold tons), and the evaporator should not be too large. The above two items can be adjusted by checking the suction pressure, and it is best to control the suction pressure at 2.3 ~ 3.2Kg (ambient temperature). When the temperature of the compressor shell is about 35°C, the temperature should be lower than the suction end of 20°C)
  • The pipeline connection should be as short as possible. In addition, a thermal insulation layer should be added outside the pipeline from the evaporator to the compressor.
  • The condenser should be cleaned regularly, at least once a week, and the construction vehicle should be cleaned every day, otherwise the cooling effect will be seriously affected.
  • In addition, when the fuel valve or the weather is hot, the compressor stops or the compressor stops because too much refrigerant is injected, which makes the compressor pressure too high.
  • When setting the temperature of the thermostat, the difference between the start and stop temperatures should be at least 3°C, otherwise the compressor will start frequently and power consumption will be large.
  • The positive pole of the electric air conditioner must be connected to the positive pole of the battery or the motor terminal, and cannot be connected to the meter, and the negative pole must be connected to the negative pole of the battery.
  • The gray line of the controller is forbidden to test the light directly. It can be detected by a multimeter or a relay.
  • Power batteries (electric tricycle traction batteries) must be installed when installing batteries. It is forbidden to install batteries of the same type as the original vehicle.
  • The external unit of the electric air conditioner should be installed to avoid the exhaust pipe of the engine, so as not to cause the high temperature of the external unit. The distance between the back panel of the electric air conditioner and the cab should not be less than 10 cm to ensure that the condenser fan has sufficient air intake.

10. Error Codes

  • EC: Temperature sensor fault. Check the temperature probe connector or replace the panel temperature probe.
  • EF: Internal fan failure, possibly due to a short circuit or overcurrent. Check the indoor fan for short circuit or carbon brush issues.
  • E1: Undervoltage/Overvoltage. Check power supply wiring and undervoltage settings.
  • E2: Controller overcurrent protection. Check the heat dissipation of the external machine, whether there is a heat source at the installation location, and if there is too much refrigerant.
  • E3: Controller stall protection. Check the compressor connection line for poor contact, or if the compressor is stuck in the cylinder.
  • E4: Controller undervoltage protection. Check the power supply line of the controller and the controller undervoltage protection.
  • E5: Short circuit protection or controller damage. Check the connection line between the controller and the compressor for wear and short circuit.
  • E6: Controller overvoltage protection. Check if the system voltage exceeds 30 V.
  • E7: Three consecutive startup failures, generally caused by E3 or E12.
  • E8: Outdoor fan failure. Check the fan connection cable.
  • E9: The temperature switch or pressure switch is disconnected. Check system pressure or temperature switch.

Disclaimer
1. Installation Responsibility: Our company provides installation manuals. Users must adhere to these instructions strictly. Any man-made faults, damages, or other accidents resulting from failure to follow these guidelines are the sole responsibility of the user. This includes all maintenance and material fees incurred. Our company will not bear any responsibility for these issues.
2. Safety Responsibility: Users must prioritize safety during installation. Any personal safety issues that arise are the sole responsibility of the user.
3. Unauthorized Modifications: If users make unauthorized modifications to the air conditioner or use non-original parts, leading to damage to the air conditioner or personal injuries, the user, not our company, will bear all responsibilities.
4. Agreement to Disclaimer: By purchasing our product, users are deemed to agree to this disclaimer.