Check out our FAQ on this page, it covers common questions about installation, power setup, battery compatibility, troubleshooting and more.
Still have questions? We're happy to help! Contact us directly and we’ll get back to you within 1–12 hours.
📬 If you don’t see our reply within 24 hours, please check your spam or junk folder just in case it was filtered.
Contact us
Where Can I Find the Installation Manual for the AC Unit?
You can view or download the manuals and watch installation videos for each unit below:
Summit 2 (12V/24V/48V Rooftop Unit)
Download Installation Manual (PDF)
Watch Installation Video
Glacier Pro (12V/110V Rooftop Unit)
Download Installation Manual (PDF)
Watch Installation Video
Skyeline Mini Split Units
12,000 BTU Version:
Installation Manual (PDF)
12,500 BTU Version:
Installation Manual (PDF)
Can the Rooftop Unit Be Installed on a Vertical Wall?
No, the rooftop unit is not designed for vertical installation. Mounting it on a wall can interfere with proper drainage and may cause water leaks or water buildup inside the evaporator housing.
For best performance and to avoid damage, always install the unit on a mostly horizontal surface (tilt up to 15° is acceptable).
Can the Rooftop Unit Be Installed on a Sloped Roof?
Our rooftop unit is designed for flat (horizontal) installation but can be mounted on roofs with up to a 15-degree tilt without affecting drainage. This makes it compatible with the slight slopes often found on vans, RVs, and trailers.
- You can trim the gasket to create a level surface and keep the tilt within the recommended range.
- One customer installed the unit on a 45-degree pop-up roof. It worked well due to the dry climate, which reduced condensation.
What Roof Thickness is Supported by Rooftop AC Units?
Summit 2 Model
The Summit 2 rooftop air conditioner is designed for roof and ceiling combinations between 1.5 and 3.5 inches thick.
If your roof falls outside this range:
For roofs thicker than 3.5 inches:
you can use our official extension kit, which allows installation on roofs up to 8.7 inches:
https://outequippro.com/products/summit-2-rooftop-ac-extension-kit
For roofs thinner than 1.5 inches:
To ensure a proper seal and secure fit, you can:
1. Trim the air duct slightly to reduce excess length
2. Use a thicker rooftop gasket beneath the outdoor unit
3. Add spacers above the indoor unit to maintain a tight fit
👉 See how a customer handled this
Glacier Pro Model
The Glacier Pro is compatible with roofs up to 2.9 inches thick.
For thicker roofs:
1. Detach the air box from the indoor panel
2. Insert a spacer between the air box and the outdoor chassis to extend the duct connection and maintain proper airflow
What Are My Options for Routing the Power Cable During Installation?
Note: Our rooftop AC units (current and future versions) do not use Anderson connectors on the power cord.
You have three options for routing the cable:
- Drill a dedicated hole for the power cable and seal it with a cable gland or grommet. This keeps the wiring secure and waterproof.
- You can run the cable through the return air duct and the existing roof cutout — no extra holes needed.
👉 Watch the install demo - The outdoor unit sits about 1 inch above the roof. You can cut a small notch in the gasket corner to pass the cable under the unit and into the existing roof opening.
Can I install the rooftop unit at a 90° or 180° rotation from the standard orientation?
Yes, the unit can be installed with a 90° or 180° rotation from the standard orientation. Rotating it in either direction will not affect its cooling or heating performance. Just make sure the installation is secure, watertight, and properly sealed.
Can I connect my rooftop air conditioner to my ceiling ducting system?
OutEquipPro rooftop air conditioners are ductless units. They are designed to deliver cooled or heated air directly into your space rather than through ductwork. This design is more efficient because all the conditioned air goes straight into your cabin or van, without any loss that can occur through ducts. The unit cannot be reversed or connected to a ceiling duct system.
How Do I Change the Temperature Display from °C to °F?
To switch between Celsius (°C) and Fahrenheit (°F) on your remote:
Press the “Turbo” and “Swing” buttons at the same time.
(No need to hold — just press them once together.)
The display will instantly toggle between °C and °F.
Note: The indoor panel is fixed to display Fahrenheit (°F) and cannot be changed.
Does your unit support Bluetooth control?
Yes, all our rooftop air conditioner models support Bluetooth functionality. To enable it, you can purchase our upgraded indoor control panel with a built-in Bluetooth module. Simply swap it with your existing control panel.
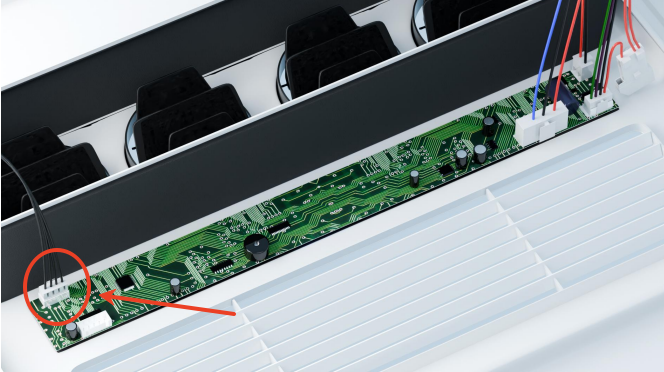
EC Error Code – Meaning & Fix
The EC1/EC2 error code usually indicates a communication issue with the internal temperature sensor.
To fix this:
- Turn off the AC unit and disconnect all power to ensure your safety.
- Locate the temperature sensor plug on the control board inside the unit.This small connector may have come loose during shipping or installation.
- Check the connection—make sure the plug is fully seated. If it looks loose, gently press it in until it clicks into place.
- Restore power and restart the unit. If the connection was the issue, the EC error should clear.
- If the error persists or the plug appears damaged, please contact us and we’ll assist with the next steps, including replacement parts if needed.
E1 Error Code – Meaning & Fix
The E1 error code indicates low or over voltage protection. In most cases, it occurs because the input voltage is lower than the unit’s undervoltage protection setpoint, and the power supply can’t deliver stable or sufficient voltage to run the air conditioner.
This protection feature is built into all our AC models (12V, 24V, and 48V) to prevent damage to the compressor and your battery.
Why This Happens:
- The battery is low or deeply discharged
- The power source can’t keep up with the unit’s current demand
- The battery isn’t rated for high-discharge loads
- Wiring is undersized or too long, causing voltage drop
- Old or degraded batteries may appear to have a healthy voltage at rest, but voltage can drop rapidly under heavy load, triggering the E1 error
Model-Specific Current Draw (Turbo Mode):
- 12V (Summit 2 – 10,000 BTU): 58A
- 12V (Glacier Pro – 11,500 BTU): 62A
- 24V (Summit 2 – 11,000 BTU): 35A
- 48V (Summit 2 – 11,000 BTU): 18A
Recommended Power Setup:
- Battery Type: LiFePO₄ (lithium deep cycle)
- You can press the Voltage button on the remote control to check the actual voltage the AC unit is receiving.
- Discharge Rating: Continuous output equal to or greater than the AC’s maximum draw
- Wiring: Use proper gauge to minimize voltage drop
Steps to Fix:
- Fully charge your battery and make sure it’s operating at full output.
- Double-check your battery specs and wiring setup to ensure they match the air conditioner’s power requirements.
- Restart the unit and see if the E1 error clears.
- If you're unsure about your battery or wiring, send us a photo or details of your setup — we’ll gladly review it and help troubleshoot.
Optional: Adjust the Low Voltage Protection (for advanced users)
If you're confident your battery is healthy and capable, but you're still getting E1 errors due to a conservative protection threshold, you can lower the undervoltage protection setting using your remote:
How to Adjust Undervoltage Protection:
- Press the "VOLTAGE" button once to enter undervoltage protection mode.
- Press the "VOLTAGE" button two more times to begin adjusting.
- Continue pressing to cycle between 9V and 11.5V (increments of 0.5V).
- Stop pressing once the desired value is shown — the setting will save automatically.
Warning: Lowering the protection limit allows the unit to run on lower voltages but may stress or over-discharge your battery. Only adjust this if you're sure your system can handle it.
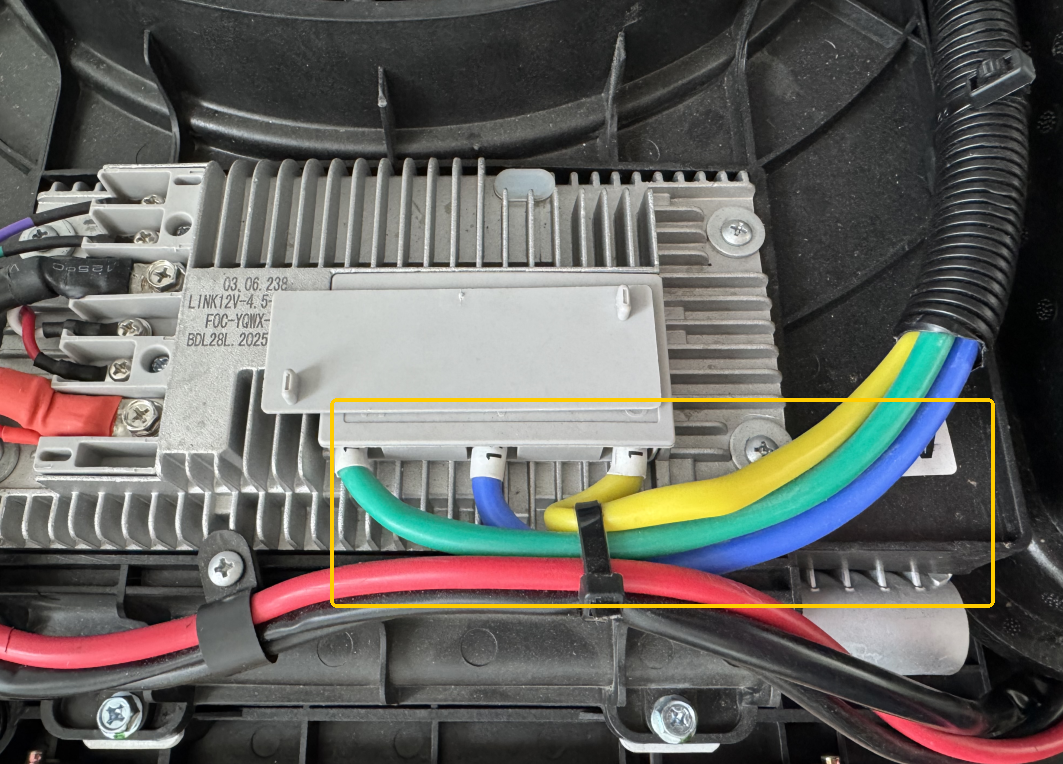
E3 Error Code – Meaning & Fix
The E3 error on your rooftop unit indicates a compressor protection issue, often caused by one of the following:
- Loose or incomplete wiring connections to the compressor
- Temporary compressor blockage or lockout
Here’s how to troubleshoot it:
- Power Cycle the Unit
Disconnect the power source completely (battery, shore power, or solar) and leave it off for 30 minutes. Then reconnect and turn the unit back on. This can reset the system and clear temporary errors. - Check Compressor Wiring
Inspect the yellow, blue, and green wires connecting the compressor and controller. Make sure all are firmly connected and none are loose or unplugged. These are the three-phase wires required for the compressor to operate correctly.
If the error persists after these steps, contact us with photos of the wiring connections and a description of your power setup. We’re here to help and can offer further guidance or arrange for service if needed.
E4 Error Code – Meaning & Fix
The E4 code on your OutEquipPro air conditioner is a voltage protection warning. It occurs when the supply voltage is too low or too high while the unit is running. Follow these steps to diagnose and resolve the issue:
1. Check Voltage Quickly
- Using the remote: Press the “VOLTAGE” button to see the voltage the A/C is receiving.
- Using a multimeter: Measure the DC voltage directly at the A/C power leads, where the cable connects to the unit. Do not measure voltage elsewhere along the cable, as readings from other points may not reflect the true voltage the unit is receiving. Take the reading while E4 is displayed and snap a photo. Note the battery voltage at the same time if possible.
2. Inspect Your Setup
- Power connections: Ensure all battery terminals are tight and secure. Even slightly loose connections can trigger E4.
- Extended cables: If you’ve lengthened the factory power cord, check all extension connections. Loose connections may cause momentary voltage drops.
- Voltage drop: The E4 error can be caused by sudden and transient voltage drops, often resulting from poor cable contact or loose connections during installation.
3. Gather Key Information for Support
When contacting OutEquipPro, provide:
- Battery brand/model, chemistry, capacity, and BMS continuous amp rating
- Cable gauge and one-way length from battery to unit
- Fuse/breaker size and type
- Any DC-DC charger or 12↔24 V converter (model & amp rating)
- Whether an alternator or other charging source is active during E4
- Any other large electrical loads running at the same time
Providing this info helps pinpoint the cause and determine whether a replacement controller is necessary.
4. Common Causes
- Sudden voltage drops while the unit is running
- Loose or extended power cables
- Loose battery terminals
Often, adjusting connections resolves the E4 error without needing a new controller.
Next Steps:
- Confirm voltage and inspect connections as above.
- Collect the setup info listed in section 3.
- Send this information to OutEquipPro support.
The team will advise if a controller replacement is needed or if the issue can be resolved by tightening connections.
Why is my AC unit not producing cold air?
If your AC unit isn’t producing cold air, please follow these troubleshooting steps:
1. Check for Error Codes
Check your display panel for error codes. Common error codes include:
- E1: Low voltage protection. This indicates your battery voltage is too low, wiring is too long, or the battery needs charging.
- EC: Missing or loose black wire connection on the control panel board. Confirm all wires are securely plugged in.
If you see any other codes, contact us with the details for specific troubleshooting guidance.
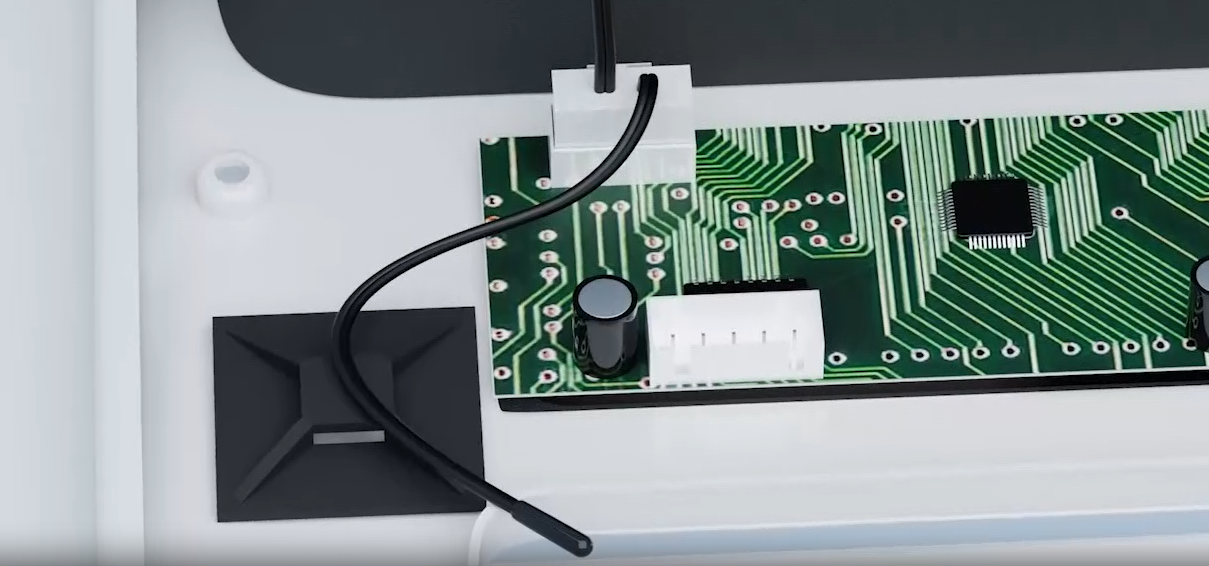
2. Inspect Control Board Connections(Summit 2 model only)
- Remove the indoor panel to access the control board.
- Ensure all plugs are fully inserted and secure. Even one loose connection can prevent the compressor from running, though the fan may still operate.
Note: This step applies only to the Summit 2 model. Other models have an integrated air box and do not require customers to plug in the internal connectors.
3. Verify Your Power Supply
- Ensure your wiring is adequate and securely connected.
- Confirm your battery provides stable voltage under load. Our AC unit can draw up to 58A(@12V) in Turbo mode, and voltage drops will stop the compressor from starting.
- If you're using a lithium battery (e.g., 12V 200Ah), please provide us with its brand and model to confirm compatibility.
4. Perform a Quick Turbo Test
- Set your AC unit to Turbo mode and run it for 5–10 minutes.
- Measure the outlet air temperature. If there's no significant temperature drop, the compressor might not be running.
If you've performed these steps and the issue persists, please reach out to our support team with details, including battery information, error codes, and photos of your setup. We're here to help!
Why is my air conditioner leaking water inside my vehicle, and how can I fix it?
Note: Starting with our newer batches from August and September 2025, we include a 14x14" pre-cut square gasket for standard roof openings, along with the original longer gasket for larger or custom roof openings. Water leaking issues are most commonly caused by improper installation of the older longer gasket, which required trimming and precise alignment. If the gasket was not properly cut and positioned, small gaps may allow water to enter.
Water leaking inside your vehicle is usually caused by an improperly sealed gasket during installation. Specifically, the outdoor unit’s chassis cutout—the section exposing the coils and fan—must be positioned completely outside the gasket’s sealing area
If this cutout is visible from inside your camper, it means the gasket is not fully sealing, allowing water to enter.
To resolve the issue:
- Contact us for a free replacement gasket, if needed.
- Trim the gasket as needed and ensure it aligns closely with the roof opening.
- Adjust the outdoor unit by sliding it slightly backward so the cutout sits entirely outside the gasket seal.
- Once aligned, securely re-tighten the mounting bolts.
- Confirm that the gasket fits snugly and evenly around the roof opening.
Why is my Summit 2 heater blowing cold air?
If your Summit 2 rooftop unit is blowing cold air in heating mode, here are a few things to check:
1. Confirm you're in heating mode – Press the “Mode” button on the remote or control panel until the sun icon appears on the display, indicating heating mode.
2. Allow time for warm-up – After switching from cooling to heating, the unit may take 10–15 minutes to start producing warm air. This delay is normal and helps protect the system during mode changes.
3. Temperature difference – If the room temperature and the set temperature are very close, the heater may not start to prevent potential damage to the system.
4. Check power supply – Insufficient power, especially from batteries with low current capacity, can prevent proper heating. If the air remains cool after 15–30 minutes:
- Verify your battery meets the unit’s power requirements.
- Ensure correct wire gauge for your installation length.
5. Heat Function Test – To confirm the heater works, set the temperature to maximum and let the unit run for 10–15 minutes. If it still does not activate, try simulating a colder environment by placing the temperature sensor tip into a cool object (like a cup of ice water) for a couple of minutes while in heat mode. This should trigger the heater.
Still having issues? If the unit does not blow heated air after an hour in heating mode, please contact support with:
- Details of your battery setup (type, voltage, capacity)
- Photo of the control panel in heating mode
- Photo of the outlet air temperature
We’ll assist you in diagnosing the issue and recommend a replacement or solution if needed, often without requiring a return.
Why does my air conditioner compressor keep cycling on and off?
Some cycling is normal. The Summit 2 uses an inverter (variable-speed) compressor that adjusts its operation based on cooling demand. As the cabin reaches the set temperature, the compressor may slow down or temporarily stop to maintain comfort while saving energy and reducing wear.
However, rapid short-cycling (every ~30 seconds) usually indicates a setup or sensor issue rather than normal operation. Here are key points to check:
1. Set Temperature: Ensure the setpoint is at least 8–10°F below the current room temperature. If the set temp is too close to ambient, the compressor may repeatedly stop and start.
2. Temperature Sensor Placement: The small sensor on the control board should be above the return air grille, away from cold supply airflow. Incorrect placement can cause frequent cycling.
3. Airflow: Make sure return and supply vents are unblocked. Proper airflow prevents high-pressure cutouts and unnecessary cycling.
4. Power Supply: For DC setups, ensure a stable feed with tight connections. Voltage sag can trigger protection cycling. Avoid low-output power stations; direct connection to a 12V battery with ≥70A continuous output is preferred.
Quick Reset: Power the unit off for 2 minutes, then restart in Turbo mode to test.
If issues persist, please provide:
- A short video showing sensor placement and remote/app settings
- Your power setup (battery type/voltage, cable length/gauge, DC-DC charger or power station)
- Room and set temperatures during the test, plus voltage under load if available
- Following these steps helps pinpoint the cause and ensures your inverter AC operates efficiently.
Tip: Proper sensor placement and sufficient voltage are the most common fixes for rapid cycling.
Can I run my 12V rooftop AC while driving and when parked?
Yes! Here’s how to make it work both while driving and parked:
1. Power While Driving
While it’s technically possible to draw directly from the starter batteries, we don’t recommend it. The 12V AC pulls ~58–62A @ 12V in Turbo, which can cause voltage dips, nuisance low-voltage trips, and long-term stress on your starter system.
Recommended safe setup:
- Alternator → Starter Battery → DC-DC Charger (40–60A) → Auxiliary (House) Battery → AC Unit
- The DC-DC charger protects your starter battery and delivers stable power to the aux bank.
- The aux battery buffers surges and provides extra current if the charger can’t keep up.
How the current flows:
- With a 60A DC-DC charger and AC in Turbo (~60A): charger covers nearly all, aux battery tops off any surge.
- With a 40A charger: ~40A from the alternator, ~20A from the aux battery.
- In ECO/Sleep (≈29–22A): charger alone usually covers the full load while also charging the aux battery.
2. Power While Parked (Engine Off)
You’ll need a dedicated deep-cycle battery bank sized for runtime.
200Ah LiFePO₄ → ~6–7 hours.
400Ah LiFePO₄ → ~10-14 hours.
ECO/Sleep modes extend runtime further since the inverter compressor ramps down to save power.
3. Wiring & Protection
Our 12V models come with a 6 AWG power cord + 100A inline fuse (14 ft Glacier Pro, 12 ft Summit 2).
Keep runs short; if extending, upgrade to 4 AWG or 2 AWG.
Add a DC breaker/disconnect between the aux battery and AC for service safety.
4. Shore Power Option (Optional)
Add a smart 110V charger or inverter/charger if you’d like to run or recharge batteries when parked at a depot or RV site.
In short:
Alternator → DC-DC Charger → Auxiliary Battery Bank → AC Unit
(with optional 110V shore charger for parked use).
This setup will let you run the unit safely while driving, then keep it going when you shut the engine off.
Is my battery compatible with the air conditioner?
To ensure safe and reliable performance, your battery must match both the voltage and continuous current requirements of your AC unit.
General Guidelines
Do not use your vehicle’s starter battery while parked.
Our rooftop AC units draw 50–60 amps continuously in Turbo Mode, which can quickly drain a starter battery and may damage it due to insufficient continuous output.
You can use the starter battery while driving, as long as:
- Your alternator can handle the added load.
- You use our prebuilt heavy-duty wiring with an inline fuse (included).
- The power cable is short and direct to minimize voltage drop.
Important: Only use the starter battery when the engine is running.
Battery Requirements by AC Model
Summit 2 – 12V Model
- Battery Voltage: 12V
- Minimum Continuous Discharge: 60A
- Batteries that don’t meet this may overheat or cause the AC to shut down.
Summit 2 – 24V Model
- Battery Voltage: 24V
- Minimum Continuous Discharge: 40A
Important: Do not connect a 12V battery directly. - You may use a DC-DC converter to step up or down to 24V if needed.
Summit 2 – 48V Model
- Battery Voltage: 48V
- Minimum Continuous Discharge: 20A
- Best suited for solar or off-grid setups due to higher efficiency.
Glacier Pro – 12V Model
- Battery Voltage: 12V
- Minimum Continuous Discharge: 70A
- Especially important for solar/off-grid users.
Skyeline Mini Split – 12V Model
- Battery Voltage: 12V
- Minimum Continuous Discharge: 70A
- Ensure your battery setup supports sustained output during compressor operation.
Key Compatibility Tips
- Your battery voltage must exactly match your AC model.
- Your battery must support the required continuous discharge current — not just peak values.
- Undersized or mismatched batteries can lead to shutdowns, error codes, or permanent damage.
How many amps does it draw?
Each rooftop air conditioner model has different current draw depending on the mode and voltage. Here's a detailed breakdown:
Glacier Pro Model
12V:
- Turbo mode: 62A
- Eco mode: 30A
- Sleep mode: 22A
- Fan only: 4.9A
- Heating: Draws up to 55A, with variable speed based on ambient temperature. There are no fixed Turbo, Eco, or Sleep heating modes — the system auto-adjusts current draw as needed.
110V:
- Turbo mode: 11A
- Eco mode: 6A
- Sleep mode: 5A
- Fan only: 0.76A
- Heating: Draws up to 10A, with variable output based on temperature. Like the 12V version, heating mode is dynamically adjusted and not divided into Turbo, Eco, or Sleep settings.
Summit 2 Model
12V:
- Turbo mode: 58A
- Eco mode: 29A
- Sleep mode: 21A
- Fan only: 4.5A
- Heating: Fixed heating mode draws 50A. It does not vary with Turbo, Eco, or Sleep — the output remains steady.
24V:
- Turbo mode: 35A
- Eco mode: 17A
- Sleep mode: 15A
- Fan only: 2.5A
- Heating: Fixed heating mode draws 26A, regardless of temperature setting or mode.
48V:
- Turbo mode: 18A
- Eco mode: 9A
- Sleep mode: 7A
- Fan only: 1.2A
- Heating: Fixed heating mode draws 13A. Like the other DC voltages, there are no variable heating modes.
How many batteries do I need?
The number of batteries you need depends on:
- How long you want to run the AC
- Ambient temperature and vehicle insulation
- The model’s power draw
All our AC units use variable-speed inverter compressors, which automatically adjust power based on cooling demand. This means lower energy usage and longer runtimes under normal conditions.
Estimated Runtime by Model (Using Lithium Batteries)
Summit 2 – 12V Model
- Current Draw: 21–58A
- Battery: 400Ah → 10–15 hours of runtime
Summit 2 – 24V Model
- Current Draw: 15–35A
- Battery: 200Ah → 7–10 hours of runtime
Summit 2 – 48V Model
- Current Draw: 7–18A
- Battery: 100Ah → 7–10 hours of runtime
Glacier Pro – 12V Model
- Current Draw: 22–62A
- Battery: 400Ah → 8–14 hours of runtime
Note:
- Actual power draw varies during use. ECO and Sleep modes reduce power further, often extending real-world runtime.
- These estimates assume the AC unit is in normal working condition. Factors such as battery age, maintenance, insulation, ambient temperature, humidity, and airflow can all impact performance and power efficiency.
Can I Power the Air Conditioner Using a Power Station?
Yes, but it depends on the AC model and the capabilities of your power station.
For 12V / 24V / 48V AC Units:
These models require high DC current, which most power stations cannot provide directly through their DC ports.
To use a power station:
- Connect the AC output of the power station to a compatible AC-to-DC converter.
- The converter must match your AC unit’s voltage (12V / 24V / 48V) and supportat least 1000W continuous output.
For 110V Model (Glacier Pro – 15,000 BTU):
- You can connect it directly to the power station’s AC output.
- Make sure your power station supports at least 1500W continuous output and can run for several hours.
What Wire Size Should I Use for My Summit 2 12V Air Conditioner?
Our Summit 2 12V model comes with a 12 ft 6 AWG power cord. Real-world testing shows a voltage drop of about 3.6% over this distance, which is a strong result for a 12V high-amp setup.
To keep your Summit 2 running efficiently and to protect your equipment, it’s important to understand how voltage drop is calculated and what standards apply.
1. Industry Standards on Voltage Drop
- ABYC E-11 (marine/RV DC wiring):
• 3% maximum drop for critical circuits (navigation, electronics).
• Up to 10% drop for non-critical loads such as A/C. - NEC best practice: 3% per branch, 5% total system drop for efficiency.
- Since A/C is considered a comfort load, up to 10% drop is permitted. In practice, we recommend designing for ~4–5%.
2. Why the Factory 6 AWG / 12 ft Lead Is Safe (Summit 2 – 12V Unit)
- One-way length: 12 ft (≈24 ft loop).
- Copper 6 AWG ≈ 0.00040 Ω/ft → Loop ≈ 0.0096 Ω.
- At 58 A (Turbo mode): ≈ 0.56 V drop (~4.6%).
This is well within ABYC’s 10% allowance and close to the 5% good-practice target.
3. Recommended Wire Sizes for Extended Runs (58 A)
Using standard copper AWG resistances at ~68°F/20°C:
- Up to 40 ft loop (20 ft one-way): Min 4 AWG (~4.8%) | Best 2 AWG (~3.0%).
- Up to 60 ft loop (30 ft one-way): Min 2 AWG (~4.5%) | Best 1/0 AWG (~2.9%).
- Up to 80 ft loop (40 ft one-way): Min 1 AWG (~4.8%) | Best 2/0 AWG (~3.0%).
Tip: Heat, multiple junctions, or engine-bay routing add resistance — when in doubt, step up one size.
4. Why This Is the Right Practice
- ABYC E-11: Comfort loads may allow up to 10% drop; we aim for 4–5% to ensure reliable compressor performance.
- NEC guidance: ≤3% per branch, ≤5% overall is considered best practice.
- Backed by industry references such as Blue Sea Systems, Paneltronics, and ABYC training guides.
In short: Our wire size chart is not arbitrary — it’s based on ABYC and NEC standards, published resistance data, and real-world testing of our inverter A/C.
5. Built-In Safety Practices
- 100 A inline fuse (12V unit – factory installed).
- Properly crimped lugs and busbars.
- Short runs wherever possible; heavier gauge for extensions.
6. How You Can Verify Yourself
- Measure DC voltage at the battery and again at the A/C input (Turbo mode).
- Record current with a clamp meter.
- Calculate drop % = (Vbattery − Vunit) ÷ Vbattery × 100.
What If the Voltage Drop Is Too High?
- ≤ 5%: Excellent — within best practice.
- 6–9%: Acceptable for a comfort load, but efficiency may be reduced. If possible, upgrade wiring or shorten the run.
- ≥ 10%: Above ABYC allowance. This can cause poor cooling, harder compressor starts, or trigger low-voltage protection.
Solutions if drop ≥ 10%:
- Use a larger cable size for extensions.
- Improve connections (lugs, crimps, fuse blocks, busbars).
- Reduce heat build-up (use thicker cable in engine bays or reroute).
Best Practices
- Always round up to a larger cable size if you’re between options.
- Use copper wire, not aluminum.
- In hot environments or engine bays, consider increasing wire size.
- Longer runs benefit from thicker wire to reduce heat and power loss, and to protect your AC system.
Tip – Using Larger Cable Runs with the Summit 2
The Summit 2 comes with a built-in power cord ending in ring terminals that connect to your battery through the included 100 A inline fuse. The unit does not have a direct wiring block sized for larger cable.
If your installation distance requires a larger cable to keep voltage drop under 4–5%, follow this setup:
- Run the larger cable from your battery toward the AC unit — keep this section as long as possible to minimize resistance.
- Transition to the factory power cord using a heavy-duty junction block or marine-grade bus bar rated for at least 100 A continuous load.
- Protect all connections — tighten securely, use corrosion-resistant hardware, and ensure the circuit is fused according to spec.
This method keeps voltage drop low over long distances while preserving the factory-engineered wiring at the AC connection point
My Summit 2 AC's power wires get hot during operation — is this normal, and what should I check?
It's normal for the 6 AWG copper power wires on your Summit 2 12V AC unit (with the included 12ft wiring) to get warm during heavy operation. During peak cooling (Turbo mode), the unit can draw 50-60 amps, which can raise wire temperatures to 120-140°F (about 50-60°C). This is within the safe design range for quality copper wire.
However, if the wires become too hot to touch or you notice any discoloration or melting, please check the following:
- Battery Condition: If your battery is old or weak, its voltage may drop under load. As voltage drops, the AC unit will draw more current (amps) to deliver the same power, making the wires even hotter.
- Voltage Drop: With the AC running on Turbo, measure the voltage at the battery and at the unit. A drop greater than about 0.7-1.0V across the 12ft run may indicate excessive resistance.
- Connections: Ensure all terminals, crimps, and fuse holders are clean, tight, and secure. Loose or oxidized connections are the most common cause of excessive wire heating.
- Ventilation: Wires running through enclosed or hot spaces will naturally run warmer. Try to route wiring in well-ventilated areas if possible.
What to do:
- If the wires are only warm (not painfully hot), this is generally normal.
- If the wires or connectors are too hot to touch, or you see any signs of insulation damage, turn off the system immediately and inspect all wiring and connections.
- Consider testing the system with a fully charged, newer battery to see if wire temperatures are lower and voltage is more stable.
- If you're unsure or need help troubleshooting, please contact us and share photos of your setup — we're happy to review your installation and offer step-by-step guidance.
What is the Energy Efficiency Ratio (EER) of your air conditioners?
The Energy Efficiency Ratio (EER) of our air conditioners ranges from 12 to 14, depending on the model and operating mode. This high EER reflects the efficiency of our variable-speed, direct DC-powered compressor and fan motor design used across all units.
What’s the difference between the Summit 2 and Glacier Pro rooftop AC units?
Here’s a quick side-by-side comparison of our two rooftop air conditioner models (both with heating):
Summit 2 (Model: OEP2500)
- Cooling Capacity: 10,000 BTU
- Heating Type: PTC electric heater (resistance heating)
- Heating Output: ~4,500 BTU — reliable even in freezing temps
- Power Draw: 21A–58A (12V DC)
- Unit Weight: ~45 lbs
- Unit Height: 6.3" (low-profile)
Best For:
- Customers in colder climates
- Those needing simple, reliable supplemental heat in small spaces
Glacier Pro (Model: OEP3500)
- Cooling Capacity: 11,500 BTU
- Heating Type: Heat pump (reverse-cycle)
- Heating Output: ~8,500 BTU — powerful and energy-efficient
- Power Draw: 22A–62A (12V DC)
- Unit Weight: ~60 lbs
- Unit Height: ~7.5"
- Advanced Tech: Twin rotary compressor, electric expansion valve
Best For:
- Customers needing higher heating performance
- Those in mild to moderate winter climates
- Users focused on energy efficiency
Heating Comparison at a Glance:
- Summit 2 (PTC Heater): Works well in very cold conditions, but with limited heat output.
- Glacier Pro (Heat Pump): Higher heat output and better energy efficiency, but less effective below 36°F.
Can I speak with someone on the phone?
We don’t currently offer general phone support in order to ensure that every response we provide is accurate, comprehensive, and well-documented.
That said, if you run into technical issues during installation or use, one of our engineers can absolutely give you a call and walk you through the process.
Just reach out to us with your request and best contact time, and we’ll arrange the call.
Can you install the unit for me?
We do not provide installation services. However, our unit is designed for easy installation, and most RV repair technicians, electricians, or experienced DIYers can complete the installation within about 3 hours. If you encounter any difficulties during installation, please feel free to contact us—we’re happy to guide you through the process.
Do you ship outside the United States?
Yes, we do offer international shipping to countries including Australia, Europe, and Canada.
Australia: $100 USD shipping fee (tax included). Delivery typically takes 30-40 days.
Europe: $200 USD shipping fee (tax included). Delivery typically takes 40–50 days.
Canada: $100 USD shipping fee (tax not included) for Summit 2 and Mini Split unit; $300 USD shipping fee (tax not included) for Glacier Pro unit; $400 for 13500BTU unit. Delivery typically takes 7–10 business days.